

Does your photography website load really slow? Are visitors jumping ship before you’re beautiful gallery even loads? If you are looking for ways to make your WordPress website load faster than this post is for you.
I get it, you spend a lot of time taking photos and editing them to pixel perfect perfection. You want your images to jump off the page and look amazing. You want them to look the way you intended, me too!
The problem, if potential visitors are leaving before the page loads then we miss the opportunity to make any impression at all. Not to mention, fast loading pages rank better in Google. Speed is good for SEO!
In this post, I will cover 15 easy things I did to make my WordPress website load faster. Let’s get to it.
How to Check your WordPress Website Speed
First, we need to find out where we are. The eyeball test is OK. I mean my site seemed to load fast for me but you can’t really trust that experience.
There are just too many variables, like internet connection and your browser caching the files. Instead, we need to run some tests.
I ran some tests to check how fast my website loaded with a free speed test tool for WordPress. You can find this tool at GTmetrix.
I ran the test on what I considered a normal blog post for me. It was 2497 words and had 10 images in the content body. The results were miserable and my WordPress website was slow, too slow! See results below. Test Post: 10 Photography Lighting Tips for Bloggers
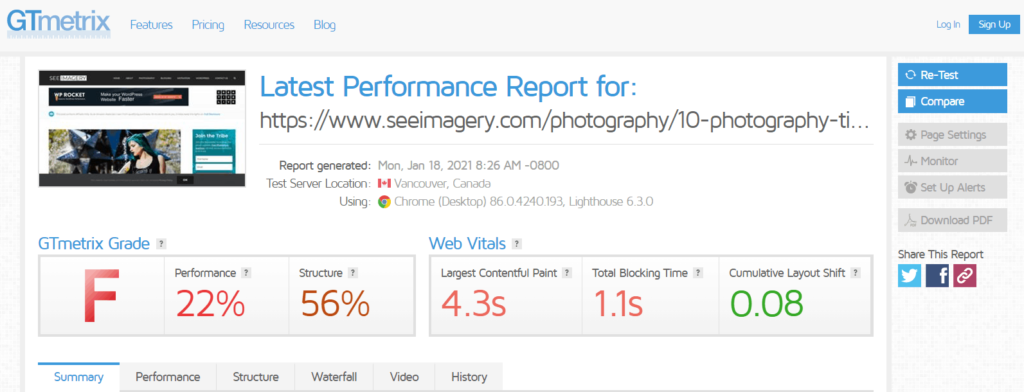
So yeah, I graded an F! Holy cow, I wasn’t expecting an A but I wasn’t expecting an F either. Action must be taken and by action, I mean a full-blown investigation.
Below you will read the 13 actions I took to improve my grade, and more importantly, my page speed.
Note: I am using Avada as my theme.
Amazing WordPress Recommendations
| SiteGround | WordPress Recommended Host |
| NameCheap | Recommended Domain Registrar |
| WP Rocket | The One Plugin I Purchased – Speed Matters! |
| Online WordPress Classes | CreativeLive WordPress Training Classes |

15 Easy things I did to make my WordPress Website load Faster
1.) I Enable a WordPress Caching Plugin
I’ve messed around with free caching plugins like WP Super Cache and W3 Total Cache with varying degrees of success vs headache stories but I’ll save you the details. If I were still going free, I would look at Cache Enabler.
However, upon making a little income from my website, I decided this was one of my first investments back into the website. In all the FB groups and blogging groups I’m part of WP Rocket always comes up.
Finally, I bit the bullet and bought a paid plugin, WP Rocket and I’m glad I did. WP Rocket’s claim is this.
“WP Rocket automatically applies the 80% of web performance best practices. You don’t need to be a rocket scientist to set it up and benefit from it.” – WordPress Rocket Share on XNow, although I agree, it was easy to setup, you do need to make some adjustments depending on your website, theme, and current plugins if you want to get the most benefit.
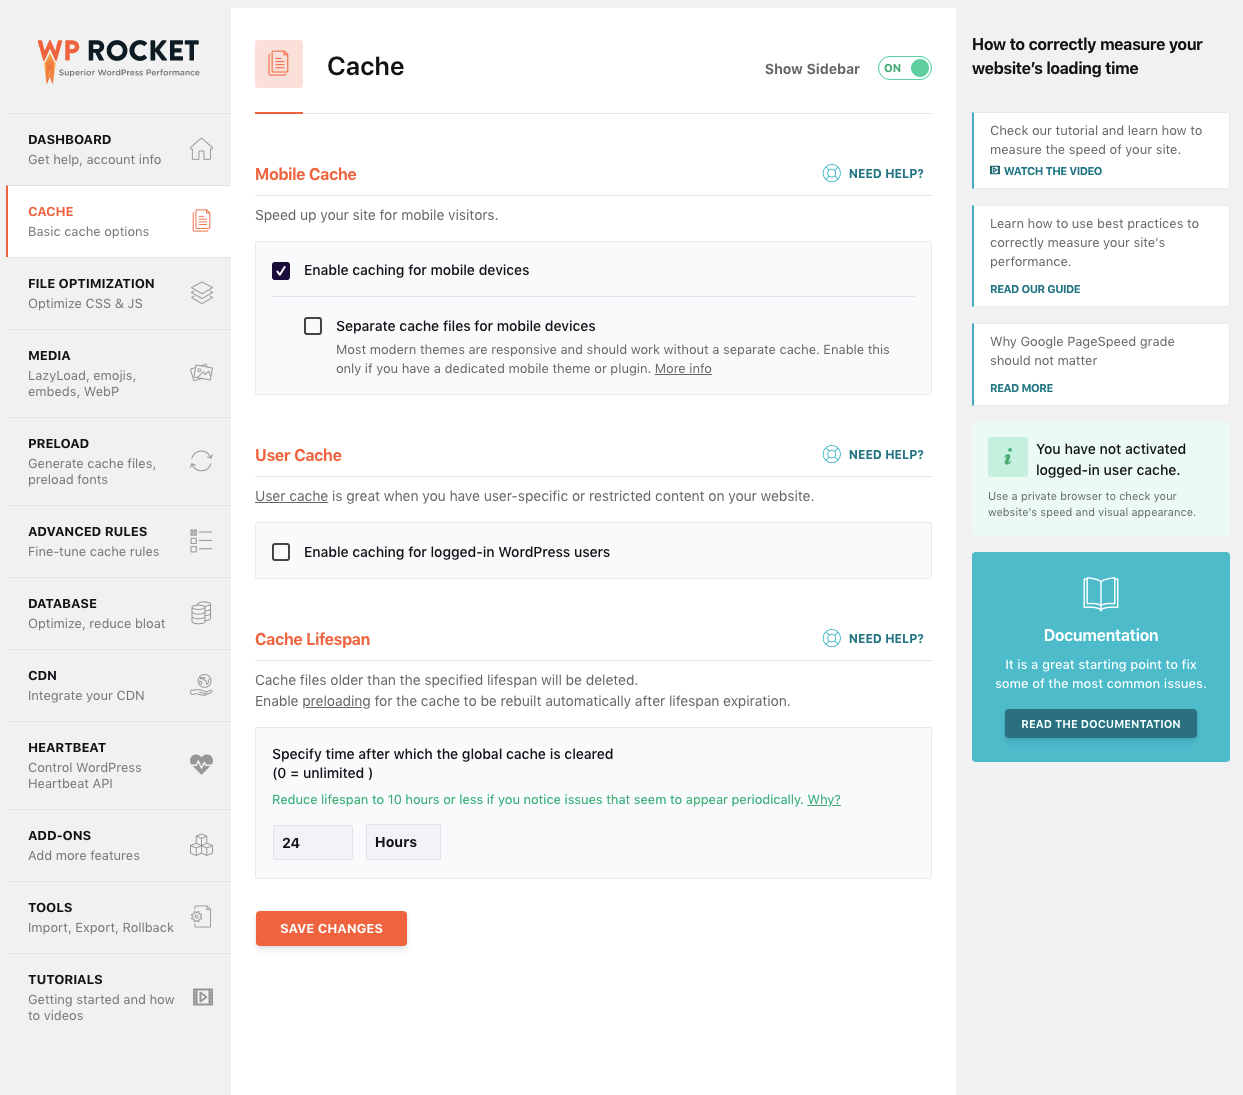
Just upon activation, my website felt faster so immediately I was happy. I figured, great purchase, this feels like at least a B.
Except, you know the feeling when a teacher hands you back a paper, one you felt confident about, and you look at it and your heart drops to the floor. A “D”, what?
Yeah, despite the clear and evident boost in speed I was experiencing visually, my GTmetrix grade was still far from good. I’m not the type of person that can accept that, you shouldn’t either!
Let’s get that A in GTMetrix!
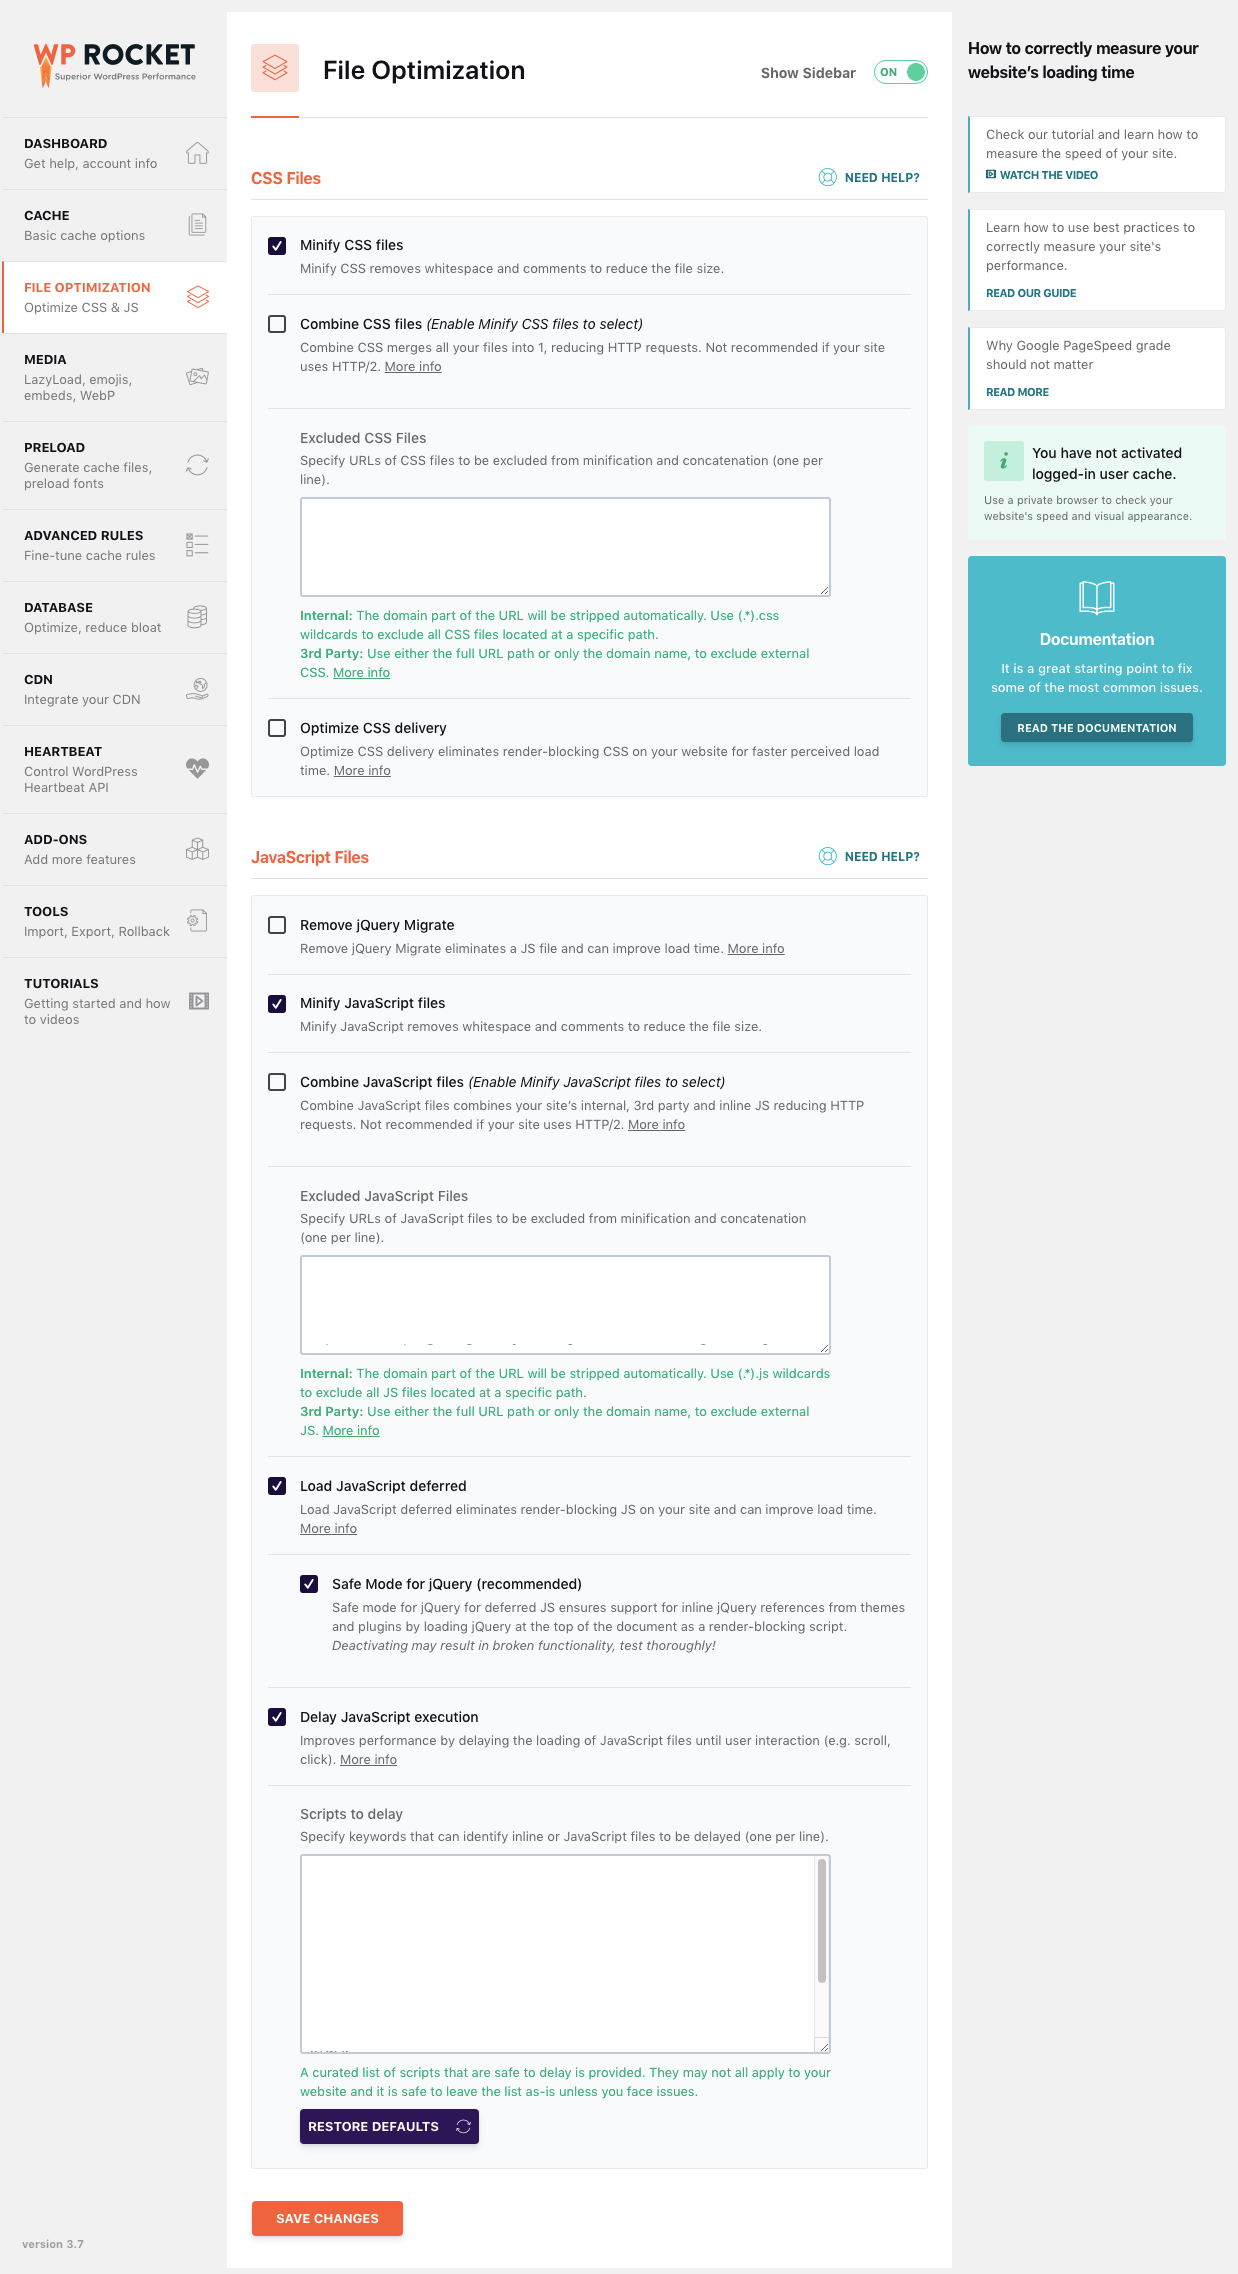
2.) I Minified my JS and CSS files
WordPress Rocket is more than just a caching plugin. It’s capable of optimizing your WordPress site in a number of unique ways.
In fact, you would probably need several different plugins to cover the functionality of WordPress Rocket. One of the first things I’m going to do is minify my CSS and JS files.
When you minify CSS or JS files, you essentially remove all unnecessary characters from the source code without altering its functionality. This makes the source files smaller.
If you don’t have WordPress Rocket you can try a free solution like AutoOptimize to achieve similar results.
3.) I Limit the use of external scripts
Turns out, this is a big contributor to poor performance and a slow website. If you want your WordPress website to load faster, you need to limit your external scripts.
To see how many scripts you have loading you can go to your GTmetrix report and select the Waterfall tab. Next, filter it by JS. You can then further sort the results by Domain to see what 3rd party domains the scripts are requesting access to.

Third-party scripts are the predominant cause of slow performance. The source is typically a plugin or line of Javascript you add your theme, perhaps inside of a widget or file. For me, affiliate Ad codes come to mind.
External scripts are necessary in some cases but not always. For example, you are probably going to want to have Google Analytics installed. The information is too valuable.
In addition, I see scripts for my Mailerlite signup forms, my Facebook Group widget, and Amazon Affiliate Ads. Only you can decide for yourself what is actually necessary. This is where tip #4 and #5 comes into play.
4.) I deferred some JavaScript to help eliminate render-blocking resources
Using WordPress Rocket, I can set the option to Load JavaScript deferred and eliminate render-blocking JS on my site. So what does that mean? Basically, it tells the browser not to wait for the script.
Instead, go ahead and continue processing the HTML and the rest of the content. This improves load time. However, delaying some scripts will not work.
In my case, everything seemed to work and load fine except for one thing, Amazon Native Shopping Ads.
When I defer them, some of them don’t show up. Recommendation Ads do work, as the code is asynchronous. However, Search Ads and Custom Ads do not work as of yet. It would be great if Amazon would update the code to work asynchronously.
Do I need these Ads? Should I switch all my Ads to simple text links and just forgo the scripts? They seem to perform better anyways. Maybe, but for this post I have decided to exclude Amazon Ads. I will run a test on this URL to compare against the other URL. Both results will be at the bottom of this post.
Note: You can defer JavaScript Manually without a plugin. Here is a usage example:
<script defer src="demo_defer.js">
</script>
Again, be aware, defer will not work with some scripts and can cause them to break. With WordPress Rocket you simply exclude these files.
5.) I delayed some JavaScript from loading until user Interaction
This is a little bit different than deferring JavaScript. In this case, you are delaying the loading of JavaScript files until user interaction, (e.g. scroll, click). This can have a huge impact on page performance and speed.
For example, I have delayed the loading of Amazon Recommendation Ads on our test post. The perceived load time is faster because they won’t bother to load until the user starts to scroll down the page.
In WordPress Rocket you simply check the box, Delay JavaScript Execution. A curated list of scripts that are safe to delay is already provided. Simply add to it as you see fit. I added /z-na.amazon-adsystem.com to the mix.
Remember, this only works with the Native Amazon Recommendation Ads. If you are using a mix of Native Search and Custom Ads then they won’t appear. Always make sure you test and check your scripts are working as intended.
You can find similar functionality in the free Flying Scripts plugin.
6.) I Enable Lazy Loading
Again, WordPress Rocket has you covered.
However, the Avada theme I’m using has Lazy Image Loading. Whenever a feature is native to the theme, I like to enable it within the theme vs a plugin. I feel like there is less chance of conflicts.
WordPress Rocket notices I have it enabled in my theme and actually tells me I don’t need to enable it. Whatever you do, don’t enable or duplicate functionality in your theme or other plugins, this can cause issues.
WordPress Rocket goes a step further in addition to Lazy loading images and allows for iframes and videos. I do enable this feature as well as replace YouTube iframe with a preview image.
If you don’t have WordPress Rocket you can find similar functionality by using Lazy Load, a free plugin by WordPress Rocket.
7.) I Cleaned up the WordPress database
WordPress Rocket can reduce bloat and optimize your WordPress database as well.
This functionality includes transients cleanup, database cleanup, and flushing your post and comment history. This includes revisions, auto drafts, spam, trash, etc.
With WordPress Rocket, all of this can be scheduled to run automatically on a set interval. I chose weekly and will just let it do it’s thing.
If you don’t have WordPress Rocket you can use WP-Optimize for similar database cleanup functionality.
8.) I configured my WordPress theme
Depending on the complexity of your theme, you are going to want to make sure you know what’s running under the hood.
I love the Avada theme, it’s capable of so much and this is great but perhaps to a detriment. If you don’t take the time to figure it out then you might be bringing a grenade launcher deer hunting.
I know, that was a terrible analogy but the point is, sometimes, Avada theme is a bit overkill. Especially for what I’m trying to achieve, I don’t need all the bells and whistles.
Under the hood, there are a plethora of options and functions I can disable. This keeps unnecessary assets from loading and slowing me down. I’m not utilizing them so why load their scripts?
For instance, Avada gives you an option to use Avada Slider, Elastic Slider, and even a third, Revolution Slider, if you choose to install.
I’m not a big fan of sliders in the first place but having all of these enabled is probably not a great idea. I’m not actively using the Elastic Slider so I disabled it as well as the Avada Styles For Revolution Slider.
You can find all my Avada Theme settings in this post (coming soon)
Now obviously, I can’t go over every possible WordPress theme. You are going to have to look into your specific theme, and see if there are options you can disable to optimize your website.
In a separate future post, I will cover each individual setting for using Avada and WordPress Rocket together.
9.) I use only the best WordPress plugins
You need to be careful what plugins you choose to download. Make sure the plugin is frequently updated and from a reputable source. You can open your website up to security vulnerabilities and even totally break your website if you’re not careful.
Also, make sure you really need that plugin. When I was new to WordPress, I was fascinated by all the additional functionality plugins provided. I ignored the “less is more” mantra because I liked bells and whistles.
Eventually, you learn, with each new plugin you add to the mix you are adding to an underlying complexity of issues that just waits to reveal itself. Some plugins don’t play well together.
Occasionally, a plugin will be working fine and then the next thing you know, an update brings your website crashing to the ground.
Just ask yourself, is this functionality really necessary? If not then forget about it and go make a new post or something.
10.) I Deactivate and uninstall plugins all plugins I’m not using
Tip #10 is really a follow-up to tip #9. All those plugins you downloaded because you wanted to test it out, you should probably delete those.
I won’t lie, I had a ton of these as I like to test stuff out. It was always bothering me and every time I got a notice to update one of them I thought, I need to sort this mess out, like today.
But then the next day would come and they would still be there.
Now, if they are deactivated they aren’t going to slow your website down but they still need to be updated or they may become security issues down the road.
Just delete them!
11.) I Optimize my image files
Way back when I just used to upload these whopping images straight out of camera. Wow, that was fun! They were probably a couple megabytes each.
Why not I figured, they seemed to be displaying at the correct width and height ratio for the space on the page.
Eventually, I smartened up though. I realized that I was making the server fetch a much larger file than necessary while also making the browser resize my image.
This is not good if you care about fast load times. There are many ways you can optimize your image files. I choose to do it before uploading them to WordPress when I export my file from Lightroom.
WordPress also has a variety of plugins you can use that will essentially optimize your image as you upload it. You can also use these plugins to optimize images you’ve already uploaded.
I go into great detail about optimizing your WordPress images in this post, How to Optimize Images in WordPress.
12.) I Use a CDN (Content Delivery Network)
If your site is targeting visitors from all around the World, then having a CDN can help. A CDN helps by employing a global distribution of servers that keep a copy of your site’s static content.
That way, when a visitor located halfway around the world visits your site they are routed to the nearest server, thereby reducing latency and displaying your content faster.
I’m a small-time blogger. Currently, I have the free plan with Cloudflare enabled, which includes unmetered mitigation of DDoS attacks, a global CDN with 155 data centers, and shared SSL certificates.
I think the free plan is a great place to start for new bloggers who want to employ a CDN. I will definitely consider higher plans as my site grows.
13.) I Use Excerpts on Homepage and Archives
Excerpts are brief summaries of your posts probably accompanied by a featured image. To read the entire post you have to click the link and visit each separate individual post. If you are still showing full content instead of excerpts on your homepage then you likely have a very cumbersome homepage.
Luckily, the solution is easy. Navigate to Settings >> Reading. Where it says, “For each post in a feed, include” choose Summary instead of Full text.
Do note, if you have an advanced theme it’s likely your theme is determining how your content is displayed regardless of this setting.
14.) I Changed my WordPress Web Hosting Provider
Your WordPress hosting provider plays a big role in determining your site’s performance. I’m using a shared hosting provider but you may be using a managed WordPress hosting service. Both are fine options depending on your needs.
Shared hosting is cheaper but if one of the sites sharing your server is experiencing heavy traffic, it can affect the entire server and impact your site’s performance. Additionally, you are responsible for many of the technical aspects including advanced security configurations and backing up your website files and database.
Managed WordPress hosting is more expensive but offers the best-optimized server configurations to run WordPress. It’s essentially tailored to WordPress. Managed WordPress hosting companies also offer auto backups, auto WordPress updates, and advanced security configurations to protect your website.
I have changed my WordPress Web Host Provider multiple times through the years. This isn’t my first blog. I do so in an effort to truly understand each host and have some basis to compare hosts. I also like saving money.
Currently, I am under a 3-year contract with Bluehost. I think it is a fine shared hosting provider but I prefer SiteGround. Also, I would look into Cloudways as I have heard lots of good things about it from people I trust.
If you are just starting out, shared hosting is fine but as your site grows, you will want to consider upgrading. Eventually, you may even want to consider a VPS or dedicated server.
15.) I made sure I was using the latest PHP version
New versions of PHP are faster and ultimately, more secure. Staying up to date is important and increases the overall performance and security of your website. Currently, the minimum recommended version of PHP is 7.4.
To check, head to your WordPress dashboard and look under Tools >> Site Health. If you are running an outdated version of PHP you should see a message under recommended improvements.
If you don’t see anything then you are probably good but you can check your version of PHP by selecting Info at the top of the Site Health Page. Next, click the drop-down arrow next to the Server Tab. You should see your PHP version there.
Unfortunately, I can’t provide you with specific instructions on how to go about updating your PHP as it’s host-specific. Instead, I’ll share two helpful resources.
This is the tutorial from WordPress: Update your PHP today
This is a list of Host Specific Tutorials on how to upgrade PHP
Final Grade – Does my WordPress Website load Faster?
You bet, I did it, I got the A on our test post: 10 Photography Lighting Tips for Bloggers

What did you do to make your WordPress website load faster?
Please use the comments below and tell us how you got your WordPress website to load faster.
Best Books on WordPress and Blogging
Join the Tribe
Want to join an amazing tribe of photographers, artists, and other creatives? Want more NFT Tips? Check out our Facebook group, NFT Photography Community. The Goal: Let’s just all help each other out!
Also, don’t forget to jump on the email list to get some free Photoshop Overlays and my “very occasional” email. I want to talk with you about inspiration, photography, blogging and just staying motivated.
Share these Pins to Pinterest


Leave A Comment