10 Photography Tips for Beginners
In our Facebook group, Photography Bloggers Nation, I recently presented the following scenario/question in regards to photography tips for beginners.
Your meeting a friend for some coffee and they just bought a new DSLR or mirrorless. Sure, they have taken plenty of photos with their phone but they want to start down the photography path. You know, it’s turning into a passion.
At this point, your friend likes landscape, travel, and street photography. They’ve also expressed an interest in portraiture, and think, at some point, they might want to explore it further.
What is your #1 photography tip or advice you offer your friend?
A conversation ensued and although the 10 photography tips for beginners below is not a verbatim list of responses, it is my interpretation.
Follow these 10 tips and I promise you will improve. You will be a better photographer than the one you were. You have to be!
1.) Shoot in RAW
The first thing I would tell you to do is shoot in RAW. RAW format is essentially your digitals cameras digital negative. It’s that simple.
If you shoot in JPEG format, it’s like shooting film with an instant polaroid camera. The end product is being decided without any of your input back in the dark room. Your camera predetermines all the sharpening, color saturation, contrast, etc.
Conversely, when you shoot in RAW you have the final say. A RAW file contains all the direct image data from the camera sensors with minimal processing.
You take the data, sit down in your favorite RAW editor, and interpret the data in your own way. Best of all, you can interpret the same file repeatedly in different ways.
A RAW file does not degrade unlike a JPEG file that degrades with repeated transformations and re-saves.
Finally, as your editing skills improve, and your photography style develops, you will have the original file in all its glory to reinterpret.
It’s possible you took some really great photos at the start of your journey. More likely, you took some once in a lifetime shots, you’re not ever going back to the same location.
I have to laugh at myself, and some of the choices I made when processing my RAW files when I first started. I’m so glad I have the freedom to go back and reinterpret that work in a style and manner consistent with my photography today.
Actionable advice: Consult your cameras manual and make sure you learn how to enable RAW.
2.) Attend a Meetup
One of the best ways to become better at something is to immerse yourself in a group with others that are trying to achieve the same thing. Meetup is a great place to find this group.
There are plenty of meetups geared toward photography. You just need to find one that is local. Typically, you will experience two types of groups.
The first group is more educational. Typically, the organizer takes on the role as educator and introduces some instructional elements the meetups.
For example, you might find a meetup titled, Learn to Develop Your Own Film or Introduction to Camera Settings, etc.
The second group has less structure but is still valuable and generally costs less. This group might just meetup for some urban exploration and abandoned building photography.
There is no formal instructional element, but usually there is a good mix of experience levels and no doubt, someone there can help you.
Best of all, you are going to make some good photographer friends!
Actionable Advice: Go to Meetup and search for some local photography groups near you.
3.) Start in Auto but pay attention
Many times, you will hear photographers tell other photographers that you need to learn to shoot manual. Of course, this is true but don’t feel like you can’t rely on auto for a bit as you become familiar with the exposure triangle.
The exposure triangle is the three variables that constitute camera settings and controls the amount of light entering you’re lens and traveling to the camera sensor. For more on that you can read this post, What is the Exposure Triangle in Photography?
Going back to Full Auto, this is where I started when I first got my dSLR camera. I knew nothing about the exposure triangle, how a camera worked, or about photography for that matter.
I read the basics about Shutter Speed, ISO and Aperture and then set my camera to Auto. However, I did not just set it and forget it. The exact opposite, I set it and paid attention.
When I aimed my camera at something, I always paid attention to the camera settings displayed in my viewfinder. What decision was my camera making and why, in regards to available light.
After spending some time shooting in auto, I switched to aperture priority. Here you simply choose the aperture and the camera does the rest. Next, I tried shutter priority where you pick the shutter speed and the camera decides the rest. Spend some time in both of these modes.
Finally, once you are comfortable, try full manual mode. Embrace it, shoot manual mode and shoot a lot! Don’t leave manual mode until you are completely comfortable.
Once you are comfortable in manual feel free to switch back to aperture priority or any mode you see fit. Choose the mode that fits the circumstance.
For instance, many professional photographers choose to shoot mainly in aperture priority. It’s not that they don’t know how to shoot manual, it’s just aperture priority fits their style of shooting better. Neither option is wrong.
Personally, I prefer to shoot in manual mode but will use aperture priority when I feel like the light or scene may change quickly, e.g., concerts, theaters, etc.
Aperture priority is also useful in situations where the subject or photographic moment is unpredictable, random, and quickly fleeting, e.g., street photography.
Actionable Advice: Set your camera to auto and point it at different scenes with varying conditions of light. Observe how your camera interprets and compensates for the available light in regards to maintaining a proper exposure.
4.) Go out and shoot with a photographer friend
This one is much in the same vein as joining a meetup but maybe you don’t want to rely on the company of total strangers. Of course, you’re missing out on an opportunity to form new friendships but I won’t judge.
Besides, you already have that photography friend. Just ask them if you can tag along on their next photoshoot.
Don’t worry about the subject matter, maybe your friend shoots portraits but you’re interested in landscapes. Who cares, you are a better photographer when you’re actually taking pictures.
Just say yes to everything! You never know where it will lead or what incites you will gather.
Actionable Advice: Go through your friend list and find your friends who have a serious interest/passion for photography. Ask if you can tag along on their next photography outing for experience.
5.) Pay attention to Light
I have mentioned this before but if we were sitting down together to discuss photography I would tell you to pay attention to light. Always be on the lookout for great light.
Even when you don’t have your camera you should be walking around all day, every day, and observing how light behaves. Take mental notes. Observe light at different times of the day and even different times of the year.
Pay attention during the golden hour, about one hour before sunset but don’t forget the other hours of the day as well. Where is the light but also, where is the shade? What would be the best way to utilize the available light?
Example: During the summer months, you note an ally that has descent shade on one side during the afternoon. Best of all, on the side receiving sun, the wall is white. Essentially, it’s a big giant reflector bouncing beautiful light into the shade.
Actionable Advice: Be on the lookout for great light 24 hour a day.
6.) For Portraits, Focus on the Eye
Maybe you took this great interesting photo but didn’t nail the focus. The eyes are not as sharp as they could be. Clearly, you missed the shot because no matter how great the image, if you miss the focus, you miss the shot.
This happened to me a lot as a new photographer and sometimes it still happens today. Nothing bugs me more than a great shot ruined by a soft focus.
When photographing people you should always focus on the eye. The eyes are the windows to the soul. You want these windows to be as sharp and clean as possible.
As long as you have the eyes in focus, everything else just seems to fall into place.
Actionable Advice: Always focus on the eyes when shooting portraits.
7.) For Landscapes, Focus on bottom third
First, don’t just focus on the furthest thing away or set the lens to infinity if there are foreground elements of interest. I used to do this when I started but you can do better.
Second, make sure you choose an acceptable aperture for landscape photography. Remember, the bigger the f/stop number, the greater the depth of field. More often than not f/11 is my go to when shooting landscapes.
Finally, as far as where to focus, for landscape photography, it depends. Because this is a beginner’s guide, however, I will not go into calculating hyperfocal distance. That’s the focal spot where we achieve maximum depth of field.
Instead, a simple rule that I often look to use, is to focus at or around the bottom 1/3 grid line in your cameras viewfinder. You’re basically trying to find a point of interest that is about 1/3rd deep into the scene.
Maybe it’s some flowers, bushes, foliage, etc. This will usually get you to the place where your foreground elements all the way to infinity is acceptably sharp. That is what you are looking for.
Actionable Advice: Be careful using focus to infinity when you have foreground elements. Instead, focus about 1/3rd deep into the frame, the bottom 1/3rd grid line is a good place to start.
8.) Remember the Rule of Thirds

If you are looking for a more complete breakdown on the rules of composition, than you should read this post, 13 Photography Composition Tips for Bloggers. For now however, let’s just focus on one rule as it is probably the most basic and common in photography.
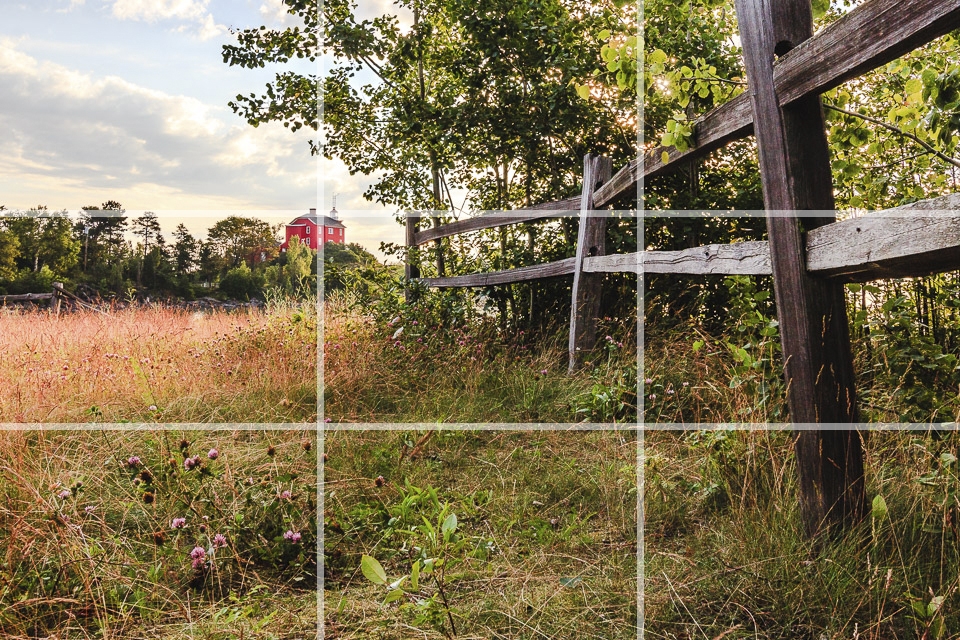
The Rule of Thirds is a visual guide, utilizing two equally spaced horizontal and vertical lines, essentially dividing the frame into nine equal parts. These lines intersect at 4 points. It is at these points of interest that you should position important elements in your frame. See the demonstration below.
Actionable Advice: Go take a photo and implement the rule of thirds.
9.) Don’t be afraid to make mistakes
With digital photography, you can make all the mistakes you want with little or no financial repercussion. If you are shooting film, you don’t have this same luxury.
Still, mistakes are what drive us to learn and become better. In fact, without practice and some hard-learned lessons, we are unlikely to even realize all the possible pitfalls.
It’s only when we try something and fail, do we truly understand what’s left to learn.
Actionable advice: Go do stuff, fail, and then learn to do better.
10.) Review your Results in Lightroom or your favorite RAW editor
This goes hand in hand with #9, don’t be afraid to make mistakes. The reason, because this is the place you’re going to find them.
As you sit down to go over your photos, you’re going to notice things and you’re going to have questions.
Why do my photos look grainy?
Why are my photos blurry?
Why does my photo have a hazy washed out appearance?
Why do my photos have a blueish tint?
Why do these trees have a purple hue outlining the branches?
You see, once you are in your RAW editor it’s review time. What worked and what didn’t work, and more importantly, why didn’t it work.
This is the time to go over your images and celebrate your successes while taking note of your failures. Don’t just accept the failure, find out why the shot didn’t work.
Review the photo and it’s corresponding camera settings, including aperture, shutter speed and ISO. All of this information should be available for each shot while in the RAW editor.
Actionable Advice: Go over your photos in your favorite RAW editor. Don’t just look at what worked. Look at what didn’t work and investigate why.
Join the Tribe
Want to join an amazing tribe of photographers, artists, and other creatives? Want more NFT Tips? Check out our Facebook group, NFT Photography Community. The Goal: Let’s just all help each other out!
Also, don’t forget to jump on the email list to get some free Photoshop Overlays and my “very occasional” email. I want to talk with you about inspiration, photography, blogging and just staying motivated.


Did you know that there is a free version of Photoshop online? Could be helpful for beginners to get their feet wet.
https://www.adobe.com/photoshop/online/photo-editing.html
Thank you, a great tip to add!