

If you followed my tutorial, “How to Install WordPress on SiteGround” then you are up and running and hopefully things are going smooth. In this post you will learn about some essential settings after installing WordPress. These are settings every WordPress site should consider.
In addition to settings, I will go over some of the best Plugins you should install. These are plugins recommended for all WordPress Installations.
Finally, we will look at some important things you should to do with a new WordPress website. These are actionable steps you can take right now. Not only will these steps benefit your website but they will also aid you in becoming acquainted with using WordPress.
In future posts, we will look at themes and plugins specifically for photographers.
Amazing WordPress Recommendations
| SiteGround | WordPress Recommended Host |
| NameCheap | Recommended Domain Registrar |
| WP Rocket | The One Plugin I Purchased – Speed Matters! |
| Online WordPress Classes | CreativeLive WordPress Training Classes |

Configuring WordPress – Seven Essential Settings after Installing WordPress
1.) Set your Site Title and Tagline – Settings >> General

One of the first things to do after installing WordPress is set your Site Title and Tagline.
The site title and tagline are some of the most important elements on your website. Together, they help people and search engines alike understand what your website is all about.
Site Title: Your site title is basically the name of your website although it doesn’t have to match your domain URL exactly. This name will appear in search results, syndication feeds, on the viewer’s browser title bar and anywhere your theme decides to display the site title.
Tagline: Your tagline is an extension of your site title and should quickly tell visitors what your website is about. A good tagline should be short, clear, memorable, catchy and informative. For example, ShoeMoney’s tagline is “Skills to pay the bills.” Some themes will automatically display the tagline while others don’t.
2.) Check your Time zone – Settings >> General

The time a post is published, auto-scheduling a post for a certain day and time? These things all require your time to be accurate. Simply select a city that is in the same time zone as you are. If you don’t see a city that is close you can use Coordinated Universal Time (UTC). You can also change the Date and Time format settings here to customize the way they’re displayed on your site.
3.) Check Your WordPress and Site Address URLs – Settings >> General

Typically, these will be the same. If you installed WordPress in a different directory on your site then you need to make the necessary change. For example, your WordPress Address could be https://mysite.com/wordpress-blog while your Site Address (home page) would be https://mysite.com
4.) Enable or Disable User Registration – Settings >> General

If you are a one man show then keep this unchecked, you don’t want just anyone registering on your site.
If you are creating a more collaborative experience then you can check the box and allow visitors to register on your site. You will need to decide on the new user default role. You want to be careful though, giving anyone too much control can be a dangerous proposition.
The subscriber role is very limited, visitors can basically create and update their user profile. Once logged in they can also comment more freely across your site.
The contributor role can actually submit content like a new post but they can’t publish it. Any content submitted will have to be approved and published by admin. I think this is a very good happy medium.
The remaining roles, author, editor, and administrator grant a lot of permission and you must be very careful if you plan to use these roles. All of these roles have the power to publish content and any administrator role has just as much authority as you do. They could delete you from your own WordPress website!
So tread lightly and regardless of what role you pick I recommend creating a custom registration form with WPForms. With WPForms you can require verification emails, smart CAPTCHA and even enforce manual approvals. The last thing you want is a bunch of spam accounts mucking around in the backend of your website.
5.) Configure Comments/Discussion – Settings >> Discussion

This section gives you more control over the discussion/commenting that will take place on your blog. Do you want to moderate every comment or is it a free for all? Do they have to enter an email address and name? Maybe you want to make them register to comment? Maybe you want no comments? All those options are right here.
6.) Configure WordPress Media Settings – Settings >> Media
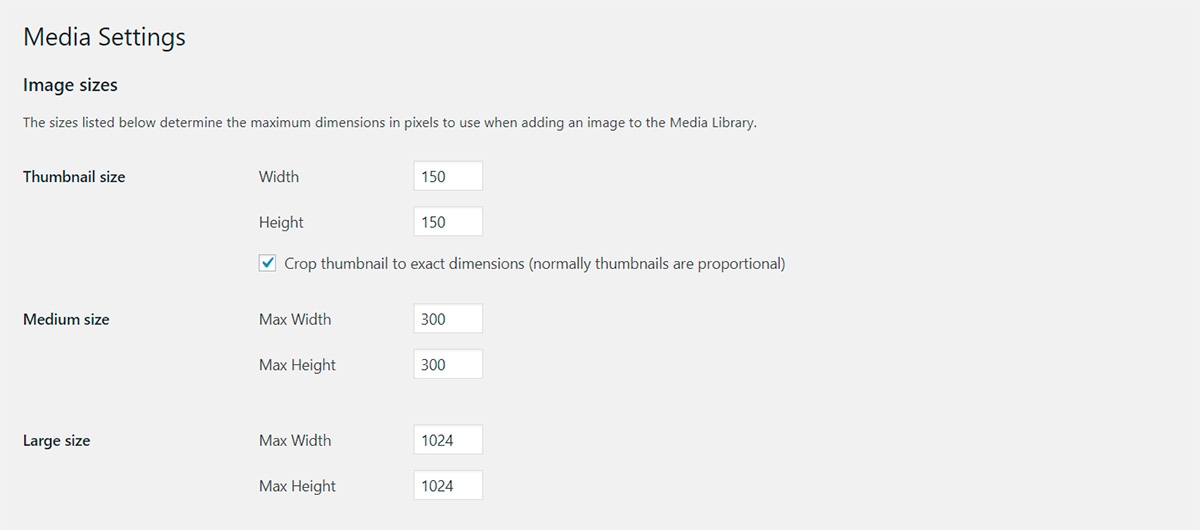
Here, you want to set the maximum dimension in pixels when inserting differing image sizes into your posts or pages. Of course, you want images that are big enough to showcase your work but not so huge that they bog down your site.
Also, it’s important to realize that WordPress creates these file sizes every time you upload an image. That means for every image you upload WordPress creates 4 copies of it, the original, thumbnail, medium and large.
If you have a lot of images you can end up with literally thousands of images sitting on your server. What’s worse is some of these sizes aren’t even being used on your site. This is bad because every image is counting against the disk space limit imposed by your web host provider.
With Site Grounds GrowBig Plan you have 20GB of webspace. Now some companies offer you unlimited or unmetered disk space. You always have to read the fine print however because typically, this is a marketing ploy. A lot of popular web hosting companies will put limits on Inodes vs. Disk Space. Inodes are basically the number of files and folders you have.
Knowing this, I highly suggest you have a plan for how you want to go about using imagery on your website and then stick with it. For instance, maybe you decide that all your images in your post are going to be large and you will never use the medium image format.
If your theme also does not incorporate the medium size image anywhere then don’t have WordPress create the file size at all. Simply set both parameters under medium size to 0. This will stop WordPress from ever generating the medium size file.
It’s worth noting that some themes have extra image sizes that are theme-specific. So yes, you could be creating more than the standard four images with each upload. Delving any deeper here, however, is way past the scope of this post.
If you want to know more there is a great post by Dumitru Brinzan at ilovewp.com called WordPress Image Sizes: a Ticking Time BOMB? He really covers it in depth.
7.) Check your Permalinks – Settings >> Permalinks

Whatever you do don’t use the plain permalinks option. You could use the Day or Month option but I feel like that would be more useful on a news site where the content is time-sensitive. The post name is a great choice but for a Photography website and really any websites, I prefer to use a custom structure.
My custom permalink structure is the post category followed by the post name and looks like this. /%category%/%postname%/
The Best WordPress Plugins – Essential Plugins for all WordPress Sites
8.) Install these useful WordPress Plugins – Plugins >> Add New

Most of the plugin listed below have free or lite versions as well as premium versions. In many cases, the free version is adequate especially when you’re first starting out. Get acquainted with the free version and if you decide you want to unlock more features upgrade down the road.
Akismet Anti-Spam Plugin – This plugin comes installed by default and will check your comments and contact form submissions against a global database of spam. It will automatically filter out all the ones that look like spam and save you a lot of headaches. For personal sites, you can obtain a free API key from Akismet to use the plugin. Once you have the key simply activate the plugin and go to “Set up your Akismet account.” From there you can enter your key.
Monster Insights – This plugin brings your Google Analytics account right to your WordPress Dashboard. Where are your visitors coming from? How long are they staying? What pages are they visiting? This is the type of information you need to make data-driven decisions to help grow your business.
Now, this is just scratching the surface when it comes to the type of data you can gather on your visitors. I will talk more about creating a Google Analytics account down below. Monster Insights comes in free and premium versions.
OptinMonster (Paid) – You need to start building your email list today, at day one, with zero traffic. Seriously, have this in place. OptinMonster is going to help you do that. It’s very customizable, easy to use and packed with great features so you can see what works and what don’t. You will need to create an OptinMonster account.
OptinMonster comes with a free trial period through a partnership with SiteGround but otherwise is a paid plugin. If you would like to get a feel on this plugin then this is a nice opportunity.
Alternatives to OptinMonster: Once the trial period ends you might be thinking, “OK, I liked that but I don’t really have the extra money laying around for another monthly payment.” Here are some alternatives to help you convert your traffic into sales and subscribers.
Convert Plus (Paid)– Currently, I’m using this and I like it a lot. At $24.00 US dollars I think it’s one of the more affordable WordPress Popup plugins. That includes lifetime updates so it’s not a monthly fee. It may not have all the bells and whistles of some of the pricier options but it will help you generate more leads and get more email subscribers. That’s really all I need.
SUMO – It’s been a few years since I used this plugin but I was really fond of it. Since that time they have updated their pricing plan.
“We just updated our pricing! Use Sumo for FREE and only pay when you get more customers.”
I jumped over to their sales page and as far as I can tell you aren’t actually limited by subscriber count but rather how many emails you can send out a month. The free plan limits you to 10,000 emails per month.
Also, with the free plan, you are missing some advanced features but the basics to get you started growing your email list is there. I really like this option because it will get you going for free. Later, you can choose to invest in advanced tools as your business grows.
WordFence Security – This is one of the more popular security plugins on WordPress and as far as free solutions, probably the most impressive. Features include Brute Force Login Protection, Security Scanning/Monitoring, WordPress Firewall and more.
Protecting your website from hackers and malicious malware is really important so don’t overlook installing some type of security. WordFence comes in both, free and premium versions for even more great security benefits.
WPForms – You’re going to need a contact page and on that contact page you are going to need a form. That’s in the begging when you’re just starting out. Then maybe one day you decide you’re going to create a custom registration form. Then before long, you’re creating all kinds of forms from surveys and polls to payments and donations. WPForms will have you covered for all your form needs. Just get it now. WPForms comes in free and premium versions.
WP Super Cache, W3 Total Cache or WP Rocket (Paid) – Caching is one of the fastest ways to improve the performance of your website. Faster load times make your visitors happy. Google also takes into account page load speed when determining search results rankings.
Considering the above we definitely want some type of caching active on our website. If you are using SiteGround to host your website then you already have a caching solution with the SG Optimizer plugin. I feel like this is sufficient but some folks choose to use more than one caching plugin.
If you choose to do this it is advised that you turn off any duplicate functionality. Two plugins trying to accomplish the same thing can actually make your site slower.
If you are using a different host without any caching functionality or wish to implement more than one caching solution, here are some options for you.
WP Super Cache – This is one of the most popular options. It’s pretty easy to configure and will give you good performance results. I recommend this one as its very beginner-friendly.
W3 Total Cache – Another popular option with a solid performance rating but it’s a bit more complicated. There seem to be a ton of configuration options so if you are into fine-tuning the specifics then maybe this is the one for you.
WP Rocket (Paid) – As far as performance this is one of the best according to several studies like this one, “Benchmarking the Fastest WordPress Cache Plugins.” It’s also easy to configure and includes many additional performance features. If that doesn’t convince you then just look around the web for reviews, they’re almost always positive. If you want the best of the best then go ahead and get WP Rocket.
Yoast SEO – Search Engine Optimization is your best bet at bringing free organic traffic to your website. With over five million active installs you can feel pretty confident that this is the plugin that can help assist you with that.
We all want our sites to be found in google search results and ideally, on the first page. Yoast SEO will help you optimize your posts for keywords, improve readability and assist you in writing SEO-friendly content. Yoast SEO comes in free and premium versions.
Starting with WordPress – Thirteen Essential things to do after Installing WordPress
9.) Setup your Home Page and your Blog Page – Settings >> Reading

By default, WordPress shows the latest post on your home page. If you want a more customizable home page that you can do all kinds of stuff with then you need to make some quick changes.
Before you can actually update the settings here you will have to make two new pages. Go to Pages >> Add New. Create one page called “Home” and publish it. Create another page called “Blog” and publish that. Note: You can actually call these pages whatever you want.
Now come back to the settings here and you should see the section “Your homepage displays.” Select “A Static Page.” Use the drop-down arrows to choose the page you created for the homepage and posts page respectively. The page you set as your posts page will now display your latest posts. Your homepage is a blank slate ready to customize the way you see fit.
10.) Set Categories and Choose Default – Posts >> Categories
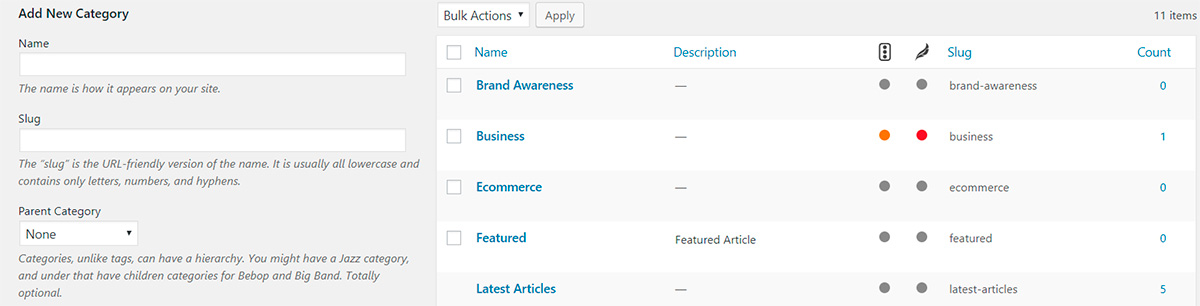
You’re probably going to want some categories for your website to help organize your content. I like to have just a few categories as too many categories can also cause confusion. Focus on a few and make them short and simple if you can.
To create your categories go to Posts >> Categories and give your category a name. Don’t worry about the slug as it will default to the name. Choose if it is a parent category or the child category of an existing category. Even though most themes don’t show the description by default I would still add one. Hit “Add New Category.” Repeat as necessary.
To choose the Default Post Category simply go to Settings >> Writing and from the dropdown box choose one of the categories created above. All new posts will now be assigned this category by default. Simply change the category while creating your post to select a different category.
What to do about the “uncategorized” category? Once a new default category is selected you can go ahead and delete this category. Alternatively, you can edit this category into something useful. Just don’t forget to update the slug as well.
11.) Create a Custom Menu – Appearance >> Menus

A lot of themes will use your existing pages to create a menu but it’s much better to create a custom menu. Custom menus are much more flexible and allow you more creative freedom.
First, give your new menu a name and then click “Create Menu.” I like to name my menu according to where it is going to go, for example, “Main Top Header” or “Footer Menu.”
Next, add your menu items from the left. You can add pages, posts, categories, and custom links. Save the menu when you’re satisfied.
Finally, you will have to assign your new menu a location in your theme. Different themes have different menu locations. At the top look for the tab “Manage Locations” and click that. Find the menu you want to use in the corresponding theme location. Once you save your new menu should be live.
Quick Tip on Category Pages:
The default category archive page will show all the posts within the chosen category. Alternatively, you can create a custom page for each category and then add individual elements to the page using a page builder. This allows you to create a much more elaborate and customizable category page. You would then add these pages to your menu instead of the default category archive pages.
12.) Configure your Theme
The settings here are really based on the theme you are using. Typically, you will find color schemes, layout choices, header and footer styles, etc. Some themes offer a few customizable settings while others offer an elaborate host of options.
Typically you can find your themes settings in the admin dashboard under the Appearance tab. Some more advanced themes actually have an independent tab all to themselves. Spend some time here and become familiar with all your theme offers.


While configuring your theme don’t forget to add a logo and upload a favicon. Look for both settings under Appearance >> Customize >> Site Identity. Depending on your theme these settings may appear elsewhere. Wherever they are, find them! They are key to helping you build brand recognition.
Add a Logo – If you want to try creating a logo yourself you can do that with services like Adobe Spark, Canva, PicMonkey, and Adobe Photoshop to name a few choices. If you rather outsource it then I don’t blame you.
Upload a Favicon – Also called Site Icon, these image icons are what you see in browser tabs, bookmark bars, feed aggregators and within some mobile apps. If you’ve ever scrolled through your bookmarks or history looking for a specific page then you’ve probably relied on a favicon to aid your search.
13.) Upload your Gravatar – Users >> Your Profile
From here scroll down to the “About Yourself” section. Next to Profile Picture you will see a link to Gravatar. Alternatively, just use the link I just shared but I wanted to give you some context. Basically, a Gravatar is your WordPress profile picture.
You want to sign up using the same email that is listed in your WordPress user profile. Now, this is the cool part. Millions of websites across the web recognize Gravatar. As long as you comment, post and signup using that same email your avatar will follow everywhere, not just your site.
This is going to help you network and insert yourself into the greater conversation, the one taking place between kindred spirits in the blogging community. Get yourself in there and let your voice be heard.
14.) Complete your Profile – Users >> Your Profile

Here you can give your profile a little life. Decide if you want your full name or perhaps a nickname to appear publicly across your website. Add or update some basic contact info, complete your bio and change your password when necessary.
Depending on your theme you may or may not see some of these fields publicly. The name you chose to display publicly will show next to your blog posts and comments. I always check the author page to see if things like bio might be included. Typically you can find your author page at https://yoursite.com/author/your-user-name/
15.) Get a Google Analytics Account

In the above-recommended plugins section, I suggested you get yourself Monster Insights. In order to take advantage of that, you will need a free Google Analytics account. Google Analytics is all about stats, stats that will help you make informed decisions regarding the traffic coming to your website.
If you already have a Gmail account you can use the same email address for your Google Analytics account. Simply head on over to the Google Marketing Platform Analytics page and set up your account. I’m not going to go into detail on how you go about this but you can use this nifty resource from Monster Insights.
16.) Add a Contact Form
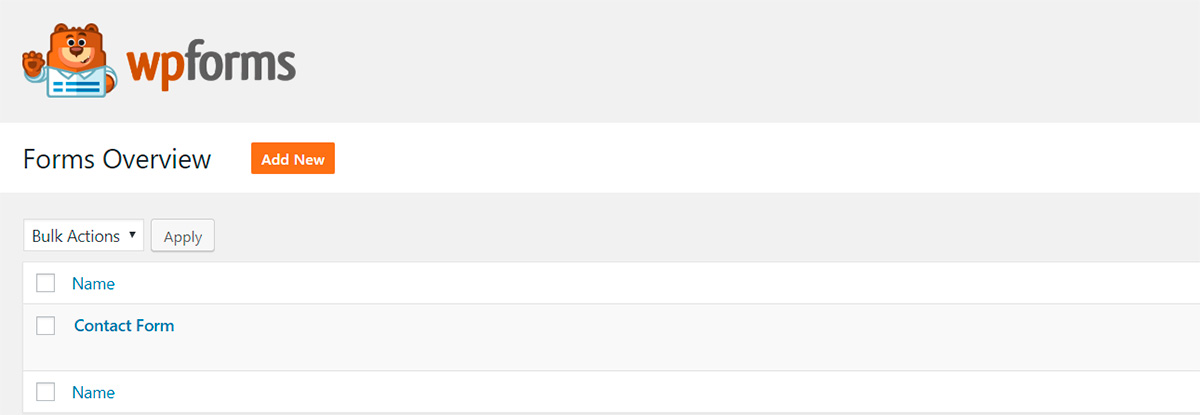
Let’s get that contact page rolling and for that, we are going to use another plugin I recommended above, WPForms.
Once you’ve installed the plugin and activated it go to WPForms >> Add New and choose “Simple Contact Form.” The form is good enough as is but if you want to make some changes it’s super simple. Just click on the form field you want to change.
Change the field labels, formats, and options from the panel on the left. Once you’re satisfied, look to the top right and click “Save”. Next, click “Embed.” Copy the complete shortcode. Completely close out of the WPForms plugin now.
Now go to Pages >> Add New and type “Contact” as the page title. Hover over “Start Writing or type / to choose a block” and click the “HTML” option to the right. Paste your shortcode in there and then Publish the page.
That’s it, you now have a contact page. Note, if you want to add some text on the page simply edit the contact page and insert a text block either above or below the shortcode block.
17.) Add a Privacy Policy

Creating a Privacy Policy isn’t fun but it is necessary as it is legally required if you collect any personal information from your visitors. This includes something as simple as a visitor’s email address. Google Analytics also requires a Privacy Policy because it uses cookies to collect data about your users.
This is just one example but many third-party services, plugins, and apps you use to enhance your website also require you to disclose information about the use of their services in your Privacy Policy.
So now that we know a Privacy Policy isn’t really an option but rather a requirement let’s get started. I’m going to give you four options to pursue in helping you create a Privacy Policy.
Option 1: Write your Privacy Policy yourself using the included WordPress template.
Go to your WordPress Dashboard Settings >> Privacy. You will find some information about creating a Privacy Policy for your website. Near the bottom, you will see the link, “Check out our guide.” Follow the link to the guide.
The guide gives you all the necessary sections you will need as well as the suggested text you should use. It also gives you recommendation on how to personalize the content to accurately reflect your specific needs.
Note: If you scroll to the bottom of the guide you will find a button labeled “Copy this section to the clipboard.” You can use that to copy only the suggested text portion of the guide minus the directions. You can then paste this into your page and edit as needed.
Option 2: Use a WordPress plugin, answer a few questions and have a simple Privacy Policy generated for you.
With WP AutoTerms you can create a general Privacy Policy as well as a Terms of Service in a matter of minutes. Answer a few questions and this plugin will create the page for you. This plugin comes in both, Free and premium versions.
Option 3: Use an Online Privacy Policy generator.
If you google “online privacy policy generator” you will find a bunch of different sites offering this service. I can’t speak to the quality of a specific one as this is not an option I’ve actively employed. If anyone has used these services feel free to share your experience in the comments below.
Option 4: Hire someone else to write your Privacy Policy.
Heck, you have enough things to do after installing WordPress to keep you busy for now. Why not outsource?
You could seek out a freelancer on sites like Fiverr and Upwork to write your Privacy Policy. Pricing would vary greatly depending on the qualifications and skills of the person hired.
18.) Install and setup Caching

What is Caching? When a visitor views a page on your site a request is sent to the server to load all the different files that make up that page. Without caching, with each page view, the same requests will be sent to your server over and over again.
With caching static files are served to visitors, thereby reducing the processing load on the server. This can greatly improve your websites performance as well as the visitor’s experience. Keep in mind, if your post and pages have dynamic content that changes often caching can be more complex.
I recommended a couple of caching solutions above in the recommended plugins section. Among my favorite was WP Super Cache for its ease of use and effectiveness. I also want to remind you that your server may also be employing some form of caching solution.
This is true if you followed my suggestion and signed up for WordPress hosting through SiteGround. If not then you will have to check with your host to see if your site is on a server using some form of caching. Whatever the case, you need to make sure you configure your caching properly.
If you are on SiteGround then by default only static cache is enabled. To enable dynamic and memcached caching you need to go into your Cpanel and turn these options on. You then have to enable it in the WordPress SG optimizer plugin. For additional details, please follow SiteGround’s tutorial on how to connect and configure WordPress with the SiteGround SuperCacher.
If you are on a different host please check with them on how to best setup and configure caching for your specific needs.
Important: If you intend to use multiple caching solutions together the most important rule is to avoid any duplicate functions. For example, if you enable cache in one, don’t enable it in the other. If you minify JavaScript in one, don’t minify JavaScript in the other.
19.) Make sure Backups are in place
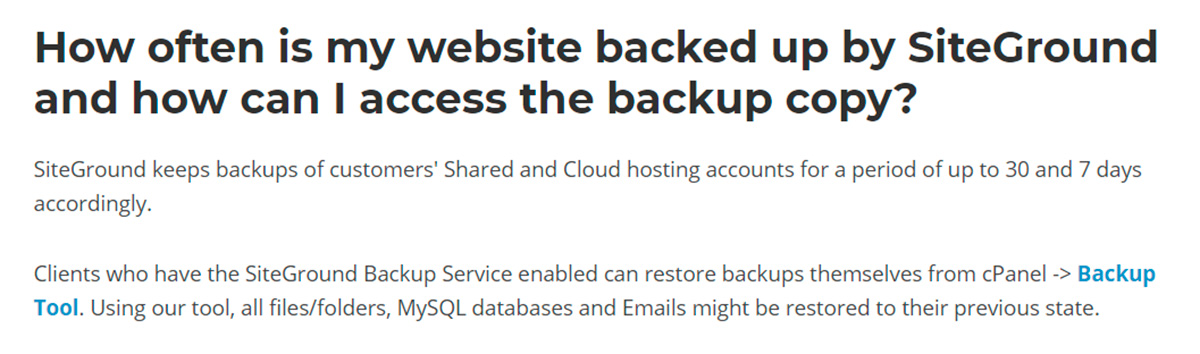
If you are using SiteGround then daily backups are already in place. If you are on the GrowBig or GoGeek plan then you can also create up to 5 on-demand backups. Visit SiteGround for more information on how to restore and create backups.
If you are using a different host you will have to check with them to see if they offer any type of backup service.
If you find yourself in a situation where you don’t have a backup service or if you just feel better with multiple sources, consider the following plugin.
UpdraftPlus – With this plugin, you can back up your files and database in the cloud. Restoring it is as simple as a single click! This plugin is free but also has a premium version.
“Backup into the cloud directly to Dropbox, Google Drive, Amazon S3 (or compatible), UpdraftVault, Rackspace Cloud, FTP, DreamObjects, Openstack Swift, and email. The paid version also backs up to Microsoft OneDrive, Microsoft Azure, Google Cloud Storage, Backblaze B2, SFTP, SCP, and WebDAV.”
20.) Remove all Sample Post, Content, Themes and Plugins
Take an inventory on what you are using and not using. Some themes come with sample content to help you visualize its structure, delete all this.
If you have unused themes and plugins, delete these as well. Even when they are not activated or being used they are taking up resources. Not to mention, they may pose a security risk if you are not updating them.
21.) Last but not least, Comment on this Post
There you have it, 21 Things to do after Installing WordPress! Did you do them all?
Go ahead and comment on this post. Make sure you include your website address in the website URL field. Let me know if this post helped you or feel free to include something I forgot to mention. Everyone will be grateful for the additional insight. Thanks a million!
Next Post: Choosing the Best WordPress Plugins to Install for Photographers
Best Books on WordPress and Blogging
Join the Tribe
Want to join an amazing tribe of photographers, artists, and other creatives? Want more NFT Tips? Check out our Facebook group, NFT Photography Community. The Goal: Let’s just all help each other out!
Also, don’t forget to jump on the email list to get some free Photoshop Overlays and my “very occasional” email. I want to talk with you about inspiration, photography, blogging and just staying motivated.


[…] Part 6: 21 Things to do After Installing WordPress […]